No. A Chiller is not necessary, especially if your not into SPS. Try to achieve 28.3C. 29C is ok. 30 is feverish. 31C will be fatal in the long run. 33 and up, get some of your water, add coffee sugar and cream. Joke. but with your lights, pumps at summertime, this is not remotely possible.
You may encounter books that say, you need temps lower than what I've said. Maybe because they have collected corals from cooler parts of the ocean. Our corals are collected here, with sea temp as high as 30C.
Still, cooling is still a challenge. If you don't have a chiller, I suggest to try any of these following methods. Better yet, try two or more, even all of them. I have a chiller. But keeping a few of these will save my chiller many hours of operation.
PC FANS
Materials: PC Fans, AC DC Adaptor, wood or glass mounting.
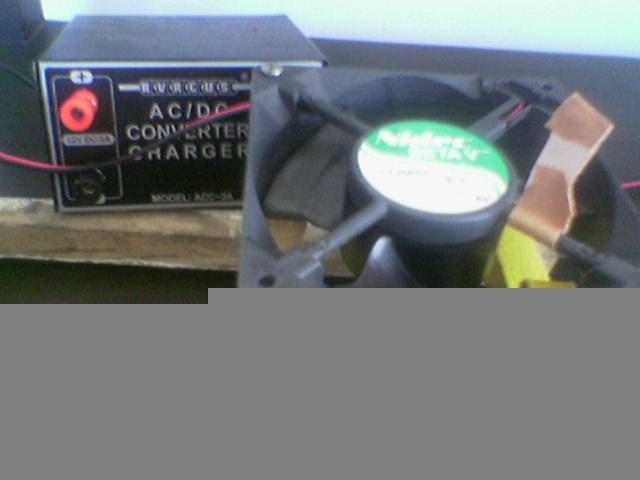
The most basic for me, and the most effective. Get the largest you can find. I use the 4inch exhaust fans from SOS. I have four above the main tank. Buy the AC DC transformer, 3 or 6 amperes. Plug-in adaptors will do, but since you will be running this for 12 hours or more, the transformer type will last longer. You may also use the 220v exhaust fans, though this will consume more electricity. If you have a sump, add fans there as well.
Problems: None actually, except for a higher evaporation rate; A fan may conk out, but the other fans will still work. Simply replace the burnt fan.
DRIP TRAY
Materials: Acrylics, acrylic glue (silicon sealant will do), acrylic cutters. for experts in glass, glass is better. Sump. PC fans.
The concept here is exposing more water molecules to the air molecules, creating a "cooling effect."
I used an acrylic board, punched 120 small holes (12x10). This is the "tray." You create a box for this. You place this box at the intake pipe (where your tank water enters your sump). Before the water even hits the sump, it is "spread out" by the tray, creating drips instead of a single surge of water from the PVC. You then blow this drip with air from PC fans. For sumpless set-ups, use a powerhead to lift water up. Think of an overhead filter with holes, situated higher for PC fans to blow on.
Optional: Place a thermopack at the back of the PC fans. The fans will blow a cooler air, until the thermopack thaws out. IMO, the thermopack has more use here than directly submerging it in the tank. You may also ask apol about his latest innovation.
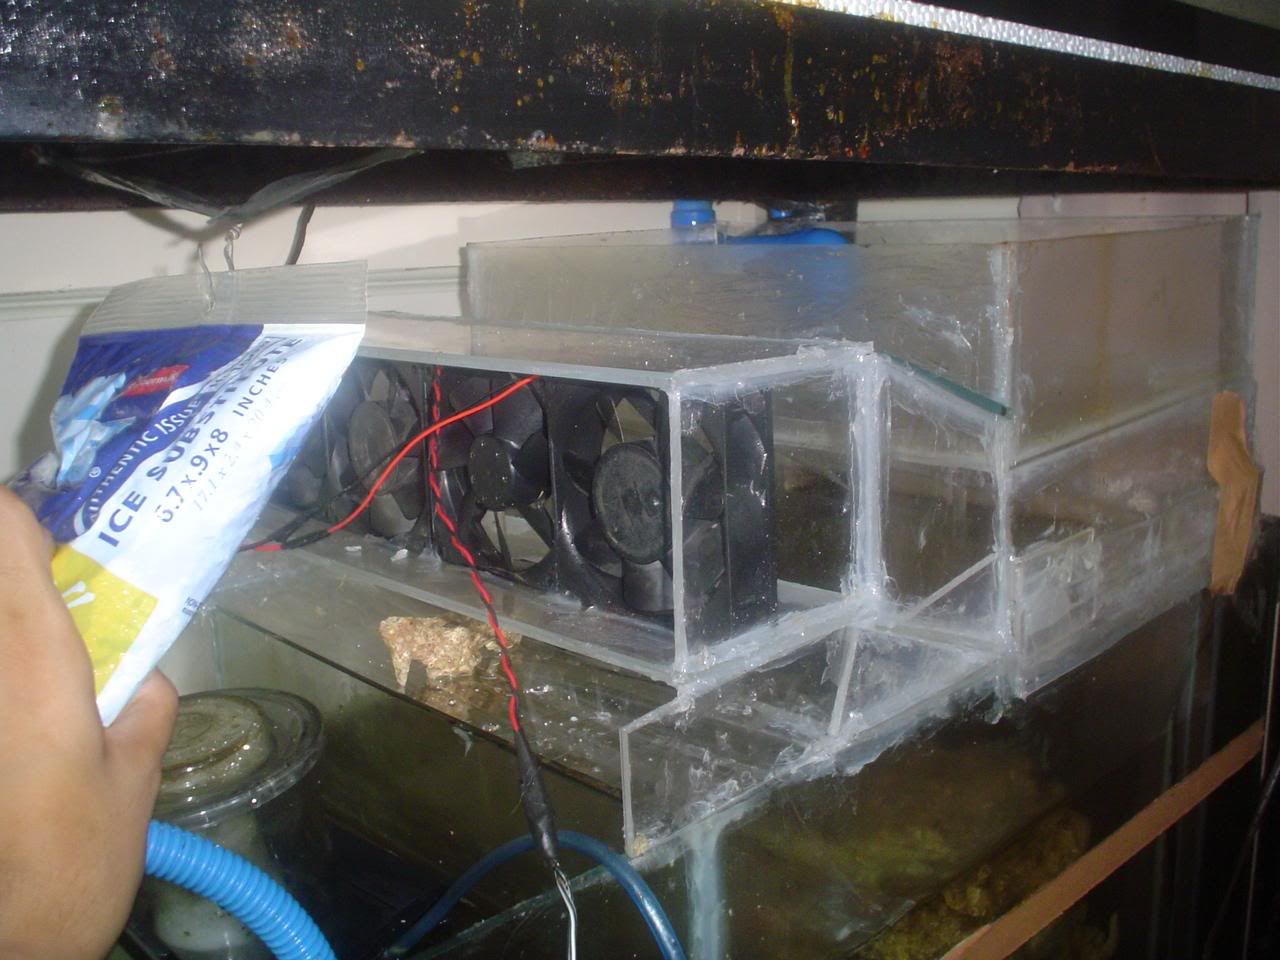
Problems: The drip splashes out water everywhere! Find a way to contain it my sealing off the box. My drip tray is permanently fixed to avoid this. I used silicon sealant to block off all possible splashes. PC fans get wet as well. Find a way to block water. As you can see, I created a "vent" to move the fans as far back as possible. Slanted, downward air direction is best.
ICED BOTTLES
Will help a bit, but unless you stay home, or someone will replace the iced bottle every hour or two, this method is purely supplementary.
What I did was place an iced 6-liter mineral water container at the sump. This would lower the temp, and with the PC fans and drip tray, it will take long before the temp goes back up.
Optional: Measure your evaporation daily. Mine is at 5 liters a day. I add 1 liter of tank water and 5 liters of freshwater (my daily evap), then freeze it. In the morning, I place this iced bottle at my tank, and remove the cover. This creates a faster cooling effect, and a 5liter top off as well. Dont worry, fresh water will "trickle out" of the bottle, and will not pour out fast. In fact, when I get home, I still see "smoke" trickling out of the bottle (that is low salinity water combining with high salinity water).
Or, freeze water from your saltwater tank, so that removing the cap is perfectly ok.
Problems: Daily (or even hourly, if this is your sole cooling system) maintenance. Large freezer space. DO NOT OVERDO by placing too much of this, since it will lead to a sudden temp drop in huge proportions, which is bad.
VENTURI COOLING
Buy a reaaaally long hose for your skimmer. Attache one end to your venturi valve, and the other to your fridge. You may use a ballpen or techpen tube, attach it to this end, so that the tube doesn't get clamped by the fridge magnet. The venturi sucks cold air from the fridge instead of the room temp air, cooling your skimmer and tank.
Problems: Explaining it to your mom or wife (what the hell is that tube doing in my fridge?!). Your beer won't be as cold.
DIY CHILLERS
Some people use soda dispensers or mineral water dispensers. They simply get the cooling mechanism, and place a powerhead/hose to this. Water goes to the powerhead, to the dispenser, then "dispensed" back to the tank. This may work for small tanks, but I doubt it for big tanks. Imagine, get three straight glasses of water from your dispenser. Notice the third glass isn't that cool anymore? Now, what if it was running fast, 24/7? Technically, they have low BTU.
Another DIY chiller is, get a coil, like the ones at the back of a small fridge, (or metal tubes elbowed to make this shape), attach a hose at both ends, then powerhead. The coil/tubes are then placed inside an ice box containing ice or thermopack. Water enters thru the powerhead, the hose, passes though the cooled coil, and back to your tank. No electricity consumed directly, aside from a small powerhead.
Problem: daily or twice a day replenishment of ice or thermopack.
Of course, DIY chillers are also made using ref and aircon spare parts. you can actually ask your ref/aircon technician to make one for you.
There are other ways I'm sure. The target of course is keeping the temp down, and with consistency, because it is equally bad to have fluctuating temps.
Hope this helps.

 Munch, Scream