All throughout summer I was planning for a light upgrade to replace my HO T5 lights and thought LED's are the best replacements. I initially planned the E27 array by seth, but then was encouraged by him to try multichips. After several days of reading on, studying LED's and forming a fairly decent light config. I went on and ordered 10 sets of multichips, drivers, and optics on ebay. Fortunately for me, these arrived with zero tax charge. The 3w LED in the last pic were given to me by Elmer (trowa).
Sad news though, my multichips never made it to the country.
Scrapping that plan, I went to read on about a full spectrum LED build. Found several good threads in Nano-reef. For anyone interested, here you go.
http://www.nano-reef.com/topic/294733-f ... -pictures/
http://www.nano-reef.com/topic/321516-w ... led-array/
So there I knew I had to just go with my original plan of 3w LED, but aside from the Royal Blue/Cool White combo, I added several other colors. Fortunately AC-RC Hobby had all the color LEDs I needed. See here https://ac-rc.net/catalog/
Now, on with the build!
I wanted this to be controllable so I went with 2 dimmable drivers, 1 for the cree blues and the other for whites and supplement colors.
LEDs I used include:
Base colors
8 Cree XT-E Royal Blue 450nm
4 Cree XP-E Blue 465nm
6 EpiLEDs Neutral White 4500K
Supplements
6 EpiLEDs Hyper Violets (2 420nm and 4 430nm)
2 sets of Ocean Coral White (2 Deep Red 660nm, 2 Turquoise 495nm and 2 Cool Blue 475nm)
Other Materials
Dimmable Drivers, for 8-12 LEDs in series, or two strings of 8-12 in series, that are in parallel
Optics (60deg frosted for crees, 90deg for whites and colors)
Heatsink, I bought 3ft of the thickest (and heaviest,
Heatsink Compound
Heatproof Silicon Adhesive
1.5-12v Regulated AC-DC Adapter for Dimming Power Supply
Wires
Potentiometers
Multimeter (for adjusting forward current of drivers)
Soldering iron and solder
Drill
Miscellaneous tools and stuff
Some pics:
Main components
LED's (heatsink compound applied)
Optics
Wires soldered, don't mind the messy wiring and soldering, I chose not to drill holes for wires because of my complicated wiring connections.
Crees all powered up for testing. Notice multimeter reading at 700mA. These are insanely bright!
White and Color Channel powered up at 1A (two strings of 9 LEDs are connected in parallel, so in actual, each LED receives only 500mA at this driver setting)
Close-up @ minimum power. Again, pardon my soldering, my dad was away and I was left to solder these.
Hyper Violet
Deep Red
Neutral White
Turquoise
Cool Blue
All LED's powered up.
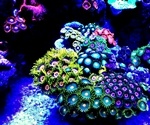
Mounted it around 12 inches from the water's surface. I am quite happy with the color blending at this level.
Had a test run today, blue channel at 70% power, 50% for white and colors. Here it is mounted over my DT. Colors really popped as I have anticipated. Please don't mind the clutter. I'll redo my rockscaping tomorrow.
Future for this project:
1. Add an aluminum housing with acrylic splash guard.
2. Install fans. I have a temporary 220v fan as of now but I want to add two smaller DC fans.
3. I may add another driver to separate whites from the colors but I am still contemplating on this.
Lastly, credits to Leica for all the lessons on electronics, seth for the ideas on LED's, alvinbam2728 for the ideas on the build and some materials and radj for letting me use his paypal account and credit card. Sama ka na rin Borbs (username12345), salamat sa pagsama sa pagbili at pagbuhat ng heatsink. hehe
That's all for now. Hope this helps those who also plan to go DIY LED's. I'll be updating soon regarding the housing and splash guard.
Thanks RP!